1. Real-Time Communication Servers
Also known as chat servers or IRC, and sometimes known as instant
messaging (IM) servers, these servers are meant to allow huge number
users to exchange information instantly.
2. FTP Servers
This is one of the oldest of the Internet services available. The FTP
or File Transfer Protocol allows the users to securely transfer one or
more files of any size between two computers.
3. Collaboration Servers
In many ways, collaboration software, once called 'groupware,'
demonstrates the original power of the Web. Collaboration software
designed to enable users to collaborate, regardless of location, via the
Internet or a corporate intranet and to work together in a virtual
atmosphere.
4. List Servers
List servers lets users
better manage their mass mailing lists like open interactive discussions
or one-way lists to deliver newsletters, announcements or advertising.
5. Telnet Servers
The Telnet server lets the users on to a host computer control and work on remote computers.
6. Web Servers
At its core, a Web server serves static content to a Web browser by
loading a file from a disk and serving it across the network to a user's
Web browser. This entire exchange is mediated by the browser and server
talking to each other using HTTP.
7. Virtual Servers
A virtual server is a web server which shares its resources with
multiple users. It's another way of saying that multiple web sites share
the resources of one server.
8. Proxy Servers
Proxy server is a server which acts as an intermediary for requests
between the users and the servers. Client connects to the proxy server
and the proxy server evaluates the requests sent by the users simplifies
them and control their complexities.
9. Mail Servers
Mail servers help in moving and storing the e-mail over a network via LANs and WANs or across the Internet.
10. Server Platforms
Normally used in same context with that of operating systems, server
platforms are the platforms that are under the hardware or software of a
system and the hence in the engine that drives the server.
11. Open Source Servers
Similar to server platforms, Open source server are referred to the
underlying open source operating system used in the IT infrastructures
of the companies.
12. Application Servers
Application servers are a type of middleware which connects the database servers and the app users.
Monday, May 5, 2014
Saturday, May 3, 2014
15 IT Courses That Will Make You An Industry Hero
1. PMP: Project Management Professional
This is a course whose credentials are recognised as one of the most important
certification for project managers. The course has an acknowledgement from the fraternity globally. It is in heavy demand globally. The course is meant for experienced project management professionals. The testing is rigorous.
2. CISSP: Certified Information Systems Security Professional
The CIISP credential is meant primarily for security managers and professionals who work towards he development of policies and procedures in information security. This course has become the global standard in information security certifications. The course was the
first in information security, accredited by the ANSI (American
National Standards Institute) to ISO (International Organization for
Standardization) Standard 17024:2003.
3. MCSD: Microsoft Certified Solutions Developer
THE MCSD is a new new Microsoft developer certification programme. This has replaced the Microsoft Certified Solutions Developer certification. The new course validated the ability of the candidate to design and build application solutions, which may well span multiple versions of a single technology or integrate multiple technologies.
4. MCDBA: Microsoft Certified Database Administrator
The course is meant for employees of MNCs that are looking for quick and reliable systems that would help process and retrieve information, throught operations of their own database servers and business intelligence software. The course is an MCDBA and an individual that is MCDBA certified can design, implement, and manage SQL Server 2000 databases. The certification was retired on 30 September, 2012, though if you achieved it before that date it will still appear on your transcript as a legacy certification.
5. CCDA®: Cisco Certified Design Associate
This course indicates that the taker of the course posses a strong foundation and apprentice knowledge of network design for Cisco converged networks. The course is meant for network design engineers, technicians, and support engineers, who enable efficient network
environments.
6. MCAD: Microsoft Certified Application Developer
This course gives its taker an industry recognition for professional developers that are involved in building powerful applications using Microsoft Visual Studio.
7. VCP-DV: VMware Certified Professional Datacenter Virtualisation
Virtualisation is one of the most important trends in modern technology. This course, provided by VMware, one of the world’s leading vendors of virtualisation products is the first step that an individual could take in gaining industry-recognized expertise in
virtual infrastructure.
8. CNE: Certified Novell Engineer
The CNE course is meant for those individuals who have the expertise and knowledge to solve advanced company-wide support problems and high-level network problems.
9. ITIL v3 Foundation
This course is more of a foundation building course meant that provides quality IT Service Management. The good thing about the course is that it uses documented and proven processes that covering the entire Service Lifecycle.
10. CCA: Citrix Certified Administrator - Citrix XenServer 6
Another entry level certification course, this validates the skills a candidate might have with one of 11 specific Citrix products, the most popular being XenApp, XenDesktop, and XenServer.
11. MCITP: Database Administrator
This is a validation course that aims at building the IT professional’s capability in the deployment, designing, optimizing, and operating technologies for a particular job role. MCITP certifications builds on the technical proficiency measured in the Microsoft Certified Technology Specialist (MCTS) certifications.
12. MCTS: SQL Server 2005
Those that have taken this course are usually IT professionals who might want to pursue careers as database administrators, database developers, or business intelligence developers. The course gives its taker a validation that the IT professional can implement and maintain databases by using specific instructions and specifications.
13. MCT: Microsoft Certified Trainer
Those that have taken this course are considered to be premier technical and instructional experts on Microsoft technologies. The benefits of the course include substantial discounts on exams, books, and Microsoft products; members-only newsgroups and online community resources; and invitations to exclusive events and programs.
14. CCNP®: Cisco Certified Network Professional
The course offers two tracks at the Associate and Professional levels - Designing and Networking. It is demonstrative of the fact that the taker has the ability to plan, implement, verify, and troubleshoot local and wide-area enterprise networks.
15. CCA: Citrix Certified Administrator - Citrix XenDesktop 5
The Citrix CCA is an entry-level certification. Earning this certification validates the candidate's skills with one of 11 specific Citrix products, the most popular being XenApp, XenDesktop, and XenServer.
Thursday, May 1, 2014
Donwload entire web using ubuntu / linux
Basic wget Commands:
To download a file from the Internet type:
If you are downloading a large file, for example an ISO image, this could take some time. If your Internet connection goes down, then what do you do? You will have to start the download again. If you are downloading a 700Mb ISO image on a slow connection, this could be very annoying! To get around this problem, you can use the -c parameter. This will continue the download after any disruptions. eg:
I have came across some websites that do not allow you to download any files using a download manager. To get around this,
This will pass wget off as being a Mozilla web browser
Downloading Entire Sites:
Wget is also able to download an entire website. But because this can put a heavy load upon the server, wget will obey the robots.txt file.
The -p parameter tells wget to include all files, including images. This will mean that all of the HTML files will look how they should do.
So what if you don't want wget to obey by the robots.txt file? You can simply add -e robots=off to the command like this:
As many sites will not let you download the entire site, they will check your browsers identity. To get around this, use -U mozilla as I explained above.
A lot of the website owners will not like the fact that you are downloading their entire site. If the server sees that you are downloading a large amount of files, it may automatically add you to it's black list. The way around this is to wait a few seconds after every download. The way to do this using wget is by including --wait=X (where X is the amount of seconds.)
you can also use the parameter: --random-wait to let wget chose a random number of seconds to wait. To include this into the command:
Other Useful wget Parameters:
--limit-rate=20k : Limits the rate at which it downloads files. (20Kb/s)
-b : Continues wget after logging out. Very useful if you are connecting to your home PC via SSH.
-o $HOME/wget_log.txt : Logs the output of the wget command to a text file within your home directory. Useful for if you are using wget in the background, as you can check for any errors that may appear.
To download a file from the Internet type:
wget http://www.example.com/downloads.zip
If you are downloading a large file, for example an ISO image, this could take some time. If your Internet connection goes down, then what do you do? You will have to start the download again. If you are downloading a 700Mb ISO image on a slow connection, this could be very annoying! To get around this problem, you can use the -c parameter. This will continue the download after any disruptions. eg:
wget -c http://www.example.com/linux.iso
I have came across some websites that do not allow you to download any files using a download manager. To get around this,
wget -U mozilla http://www.example.com/image.jpg
This will pass wget off as being a Mozilla web browser
Downloading Entire Sites:
Wget is also able to download an entire website. But because this can put a heavy load upon the server, wget will obey the robots.txt file.
wget -r -p http://www.example.com
The -p parameter tells wget to include all files, including images. This will mean that all of the HTML files will look how they should do.
So what if you don't want wget to obey by the robots.txt file? You can simply add -e robots=off to the command like this:
wget -r -p -e robots=off http://www.example.com
As many sites will not let you download the entire site, they will check your browsers identity. To get around this, use -U mozilla as I explained above.
wget -r -p -e robots=off -U mozilla http://www.example.com
A lot of the website owners will not like the fact that you are downloading their entire site. If the server sees that you are downloading a large amount of files, it may automatically add you to it's black list. The way around this is to wait a few seconds after every download. The way to do this using wget is by including --wait=X (where X is the amount of seconds.)
you can also use the parameter: --random-wait to let wget chose a random number of seconds to wait. To include this into the command:
wget --random-wait -r -p -e robots=off -U mozilla http://www.example.com
Other Useful wget Parameters:
--limit-rate=20k : Limits the rate at which it downloads files. (20Kb/s)
-b : Continues wget after logging out. Very useful if you are connecting to your home PC via SSH.
-o $HOME/wget_log.txt : Logs the output of the wget command to a text file within your home directory. Useful for if you are using wget in the background, as you can check for any errors that may appear.
Hack Into Gmail And Facebook Using Kali Linux!
1. Open the backtrack terminal use the ifconfig command to find your IP address.
2. On the terminal type cd /pentest/exploits/set
3. You will need to have the Social Engineering Toolkit (SET) for this one.
4. Start this us and then choose the second option, which says ‘Website Attack Vectors’.
5. In the next part, you have to select the fourth option, which says ‘Tabnabbing Attack Method’.
6. Choose the second option, which is ‘Site Cloner’.
7. Now you have to enter the URL of the website that you want to clone or hack into. In this case the URL will be www.gmail.com. The SET will automatically create the clone. Press enter in order to continue.
8. The URL now needs to be converted into the Google URL. For this use goo.gl and send the link address to you’re the person you want to attack. This you can do in a myriad number of ways like email, chat etc.
9. When your victim will open their internet browser for Gmail, they should get a message saying that the page is still loading. As soon as they open a new tab, the fake clone that we made will start functioning.
How To Install Wordpress on Ubuntu 14.04
How To Install Wordpress on Ubuntu 14.04
Introduction
At this time, WordPress is the most popular CMS (content management system) on the internet. It allows you to easily set up flexible blogs and websites on top of a MySQL backend with PHP processing. WordPress has seen incredible adoption and is a great choice for getting a website up and running quickly.In this guide, we'll focus on getting a WordPress instance set up with an Apache web server on Ubuntu 14.04.
Prerequisites
Before you begin this guide, there are some important steps that you need to complete on your server.We will be proceeding through these steps as a non-root user with sudo privileges, so you will need to have one available. You can find out how to create a user with sudo privileges by following steps 1-4 in our Ubuntu 14.04 initial server setup guide.
Additionally, you'll need to have a LAMP (Linux, Apache, MySQL, and PHP) stack installed on your VPS instance. If you don't have these components already installed and configured, you can use this guide to learn how to install LAMP on Ubuntu 14.04.
When you are finished with these steps, you can continue with this guide.
Step One — Create a MySQL Database and User for WordPress
The first step that we will take is a preparatory one. WordPress uses a relational database to manage and store site and user information.We have MySQL installed, which can provide this functionality, but we need to make a database and a user for WordPress to work with.
To get started, log into the MySQL root (administrative) account by issuing this command:
mysql -u root -p
First, we can create a separate database that WordPress can control. You can call this whatever you would like, but I will be calling it
wordpress because it is descriptive and simple. Enter this command to create the database:CREATE DATABASE wordpress;
Every MySQL statement must end in a semi-colon (;), so check to make sure this is present if you are running into any issues.Next, we are going to create a separate MySQL user account that we will use exclusively to operate on our new database. Creating one-function databases and accounts is a good idea from a management and security standpoint.
I am going to call the new account that I'm making
wordpressuser and will assign it a password of password.
You should definitely change the password for your installation and
can name the user whatever you'd like. This is the command you need to
create the user:CREATE USER wordpressuser@localhost IDENTIFIED BY 'password';At this point, you have a database and a user account, each made specifically for WordPress. However, these two components have no relationship yet. The user has no access to the database.
Let's fix that by granting our user account access to our database with this command:
GRANT ALL PRIVILEGES ON wordpress.* TO wordpressuser@localhost;Now the user has access to the database. We need to flush the privileges so that the current instance of MySQL knows about the recent privilege changes we've made:
FLUSH PRIVILEGES;
exit
Step Two — Download WordPress
Next, we will download the actual WordPress files from the project's website.Luckily, the WordPress team always links the most recent stable version of their software to the same URL, so we can get the most up-to-date version of WordPress by typing this:
cd ~
wget http://wordpress.org/latest.tar.gz
We can extract the files to rebuild the WordPress directory we need by typing:
tar xzvf latest.tar.gz
wordpress in your home directory.While we are downloading things, we should also get a few more packages that we need. We can get these directly from Ubuntu's default repositories after we update our local package index:
sudo apt-get update
sudo apt-get install php5-gd libssh2-php
Step Three — Configure WordPress
Most of the configuration that we will be doing will be through a web interface later on. However, we do need to do some work from the command line before we can get this up and running.Begin by moving into the WordPress directory that you just unpacked:
cd ~/wordpress
cp wp-config-sample.php wp-config.php
nano wp-config.php
We will need to find the settings for
DB_NAME, DB_USER, and DB_PASSWORD in order for WordPress to correctly connect and authenticate to the database we created.Fill in the values of these parameters with the information for the database you created. It should look like this:
// ** MySQL settings - You can get this info from your web host ** //
/** The name of the database for WordPress */
define('DB_NAME', 'wordpress');

/** MySQL database username */
define('DB_USER', 'wordpressuser');

/** MySQL database password */
define('DB_PASSWORD', 'password');
These are the only values that you need to change.When you are finished, save and close the file.
Step Four — Copy Files to the Document Root
Now that we have our application configured, we need to copy it into Apache's document root, where it can be served to visitors of our website.One of the easiest and most reliable way of transferring files from directory to directory is with the
rsync command. This preserves permissions and has good data integrity features.The location of the document root in the Ubuntu 14.04 LAMP guide is
/var/www/html/. We can transfer our WordPress files there by typing:sudo rsync -avP ~/wordpress/ /var/www/html/
We should now move into the document root to make some final permissions changes
cd /var/www/html
We want to give user ownership to the regular, non-root user (with sudo privileges) that you plan on using to interact with your site. This can be your regular user if you wish, but some may suggest that you create an additional user for this process. It is up to you which you choose.
For this guide, we will use the same account that we set up during the initial server setup guide, which we called
demo. This is the account I am performing all of the actions of this guide as.The group ownership we will give to our web server process, which is
www-data. This will allow Apache to interact with the content as necessary.We can quickly assign these ownership values by typing:
sudo chown -R demo:www-data *
This will set up the ownership properties that we are looking for.While we are dealing with ownership and permissions, we should also look into assigning correct ownership on our uploads directory. This will allow us to upload images and other content to our site. Currently, the permissions are too restrictive.
First, let's manually create the
uploads directory beneath the wp-content directory at our document root. This will be the parent directory of our content:mkdir /var/www/html/wp-content/uploads
sudo chown -R :www-data /var/www/html/wp-content/uploads
Step Five — Complete Installation through the Web Interface
Now that you have your files in place and your software is configured, you can complete the installation through the web interface.In your web browser, navigate to your server's domain name or public IP address:
http://server_domain_name_or_IP
You will see the WordPress initial configuration page, where you will create an initial administrator account: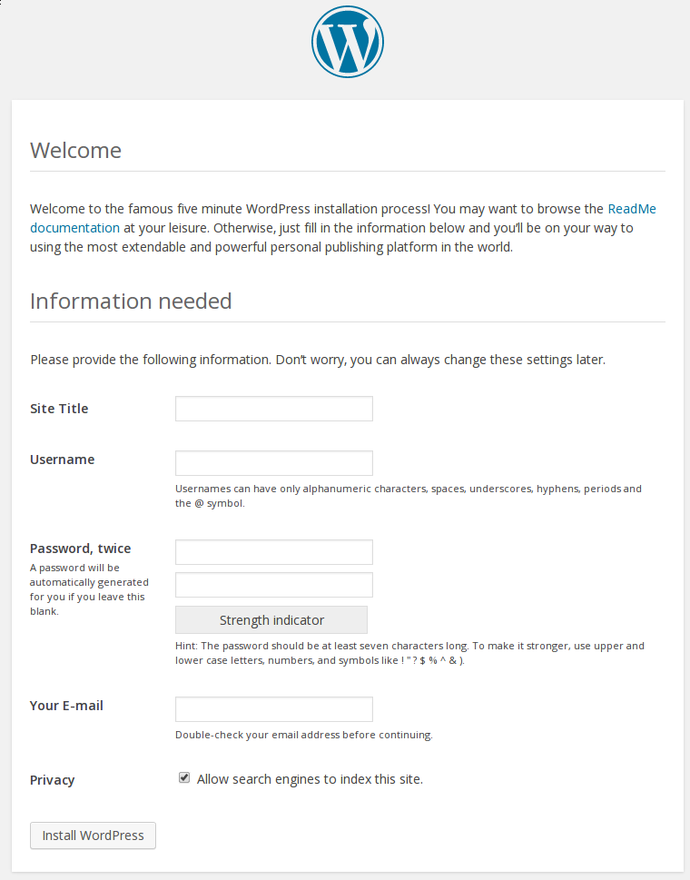
Fill out the information for the site and the administrative account you wish to make. When you are finished, click on the install button at the bottom.
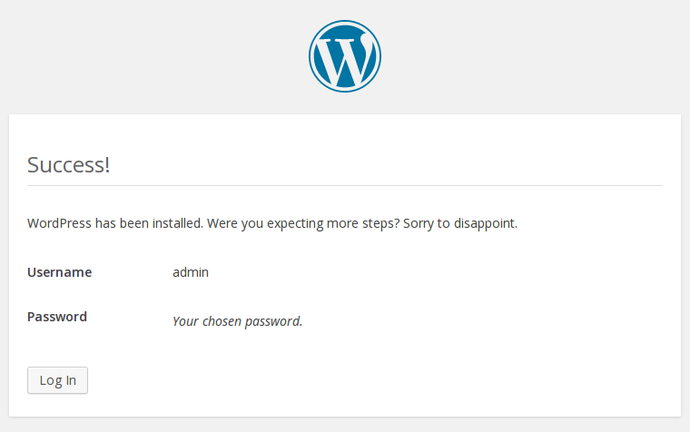
WordPress will confirm the installation, and then ask you to log in with the account you just created:
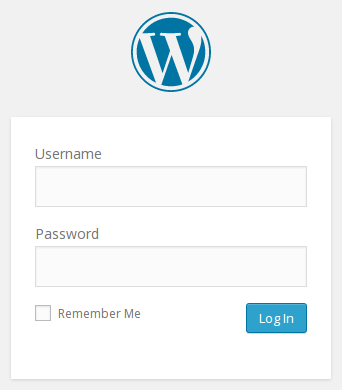
Hit the button at the bottom and then fill out your account information:
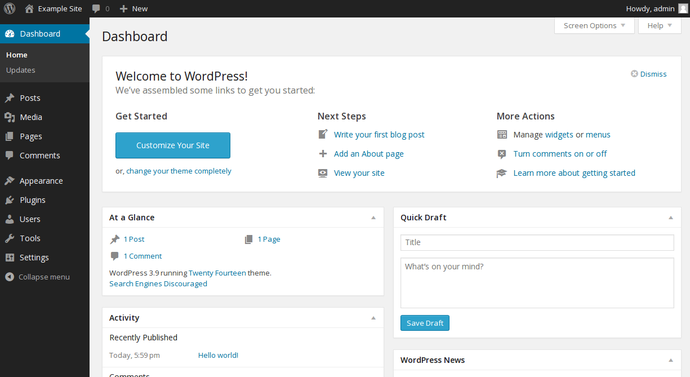
You will be presented with the WordPress interface:
Step Six (Optional) — Configure Pretty Permalinks for WordPress
By default, WordPress creates URLs dynamically that look something like this:http://server_domain_name_or_IP/?p=1
This isn't exactly the most useful interface for visitors or search
engines, so most users want to modify this. WordPress has the ability
to create "pretty" permalinks which will clean up the URL into a more
human-friendly format.There are a few things we need to do to get this to work with Apache on Ubuntu 14.04.
Modifying Apache to Allow URL Rewrites
First, we need to modify the Apache virtual host file for WordPress to allow for.htaccess overrides. You can do this by editing the virtual host file.By default, this is
000-default.conf, but your file might be different if you created another configuration file:sudo nano /etc/apache2/sites-available/000-default.conf
ServerName and create a directory section where we allow overrides. This should look something like this:<VirtualHost *:80>
ServerAdmin webmaster@localhost
DocumentRoot /var/www/html
ServerName server_domain_name_or_IP
<Directory /var/www/html/>
AllowOverride All
</Directory>
. . .
When you are finished, save and close the file.Next, we need to enable the rewrite module, which allows you to modify URLs. You can do this by typing:
sudo a2enmod rewrite
sudo service apache2 restart
Create an .htaccess File
Now that Apache is configured to allow rewrites through.htaccess files, we need to create an actual file.You need to place this file in your document root. Type this to create an empty file:
touch /var/www/html/.htaccess
sudo chown :www-data /var/www/html/.htaccess
We may need to adjust the permissions however. This depends on how you prefer to work. WordPress will generate the necessary rewrite rules for you. If it has write permissions to this file, it can implement the rules automatically. If it does not, you will have to manually edit this file to add the correct rules.
Which configuration you choose depends on how much you value convenience over security. Allowing the web server write access to this file will definitely be more convenient, but some say that it is an unnecessary security risk.
If you want WordPress to automatically update this file with rewrite rules, you can ensure that it has the correct permissions to do so by typing:
chmod 664 /var/www/html/.htaccess
chmod 644 /var/www/html/.htaccess
Change the Permalink Settings in WordPress
When you are finished doing the server-side changes, you can easily adjust the permalink settings through the WordPress administration interface.On the left-hand side, under the
Settings menu, you can select Permalinks:
You can choose any of the preconfigured settings to organize URLs, or you can create your own.
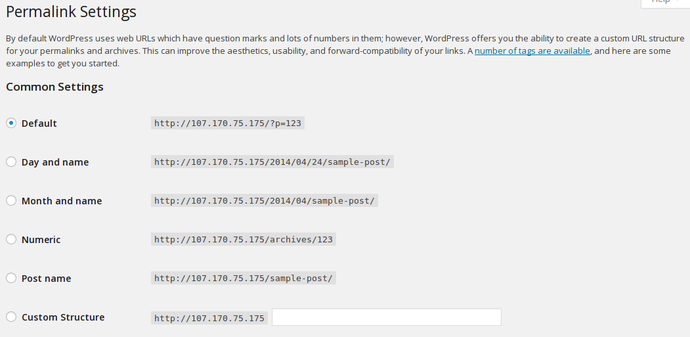
When you have made your selection, click "Save Changes" to generate the rewrite rules.
If you allowed the web server write access to your
.htaccess file, you should see a message like this: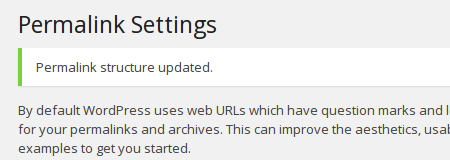
If you did not allow the web server write access to your
.htaccess file, you will be provided with the rewrite rules you need to add to the file manually.Copy the lines that WordPress gives you and then edit file on your server:
nano /var/www/html/.htaccess
Conclusion
You should now have a WordPress instance up and running on your Ubuntu 14.04 VPS. There are many avenues you can take from here. Below we've listed some options:How To Install Linux, Apache, MySQL, PHP (LAMP) stack on Ubuntu 14.04
How To Install Linux, Apache, MySQL, PHP (LAMP) stack on Ubuntu 14.04
Introduction
A "LAMP" stack is a group of open source software that is typically installed together to enable a server to host dynamic websites and web apps. This term is actually an acronym which represents the Linux operating system, with the Apache web server. The site data is stored in a MySQL database, and dynamic content is processed by PHP.In this guide, we'll get a LAMP stack installed on an Ubuntu 14.04 Droplet. Ubuntu will fulfill our first requirement: a Linux operating system.
Prerequisites
Before you begin with this guide, you should have a separate, non-root user account set up on your server. You can learn how to do this by completing steps 1-4 in the initial server setup for Ubuntu 14.04.Step One — Install Apache
The Apache web server is currently the most popular web server in the world, which makes it a great default choice for hosting a website.We can install Apache easily using Ubuntu's package manager,
apt.
A package manager allows us to install most software pain-free from a
repository maintained by Ubuntu. You can learn more about how to use apt here.For our purposes, we can get started by typing these commands:
sudo apt-get update
sudo apt-get install apache2
sudo command, these operations get
executed with root privileges. It will ask you for your regular user's
password to verify your intentions.Afterwards, your web server is installed.
You can do a spot check right away to verify that everything went as planned by visiting your server's public IP address in your web browser (see the note under the next heading to find out what your public IP address is if you do not have this information already):
http://your_server_IP_address
You will see the default Ubuntu 14.04 Apache web page, which is there
for informational and testing purposes. It should look something like
this: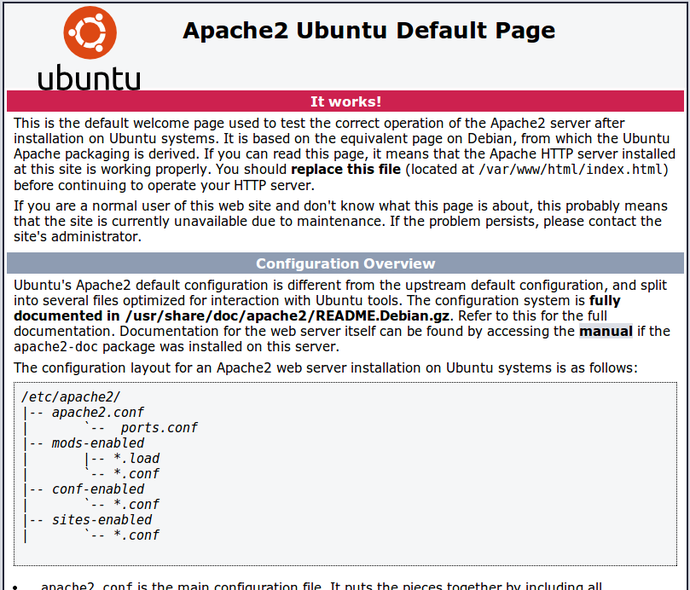
If you see this page, then your web server is now correctly installed.
How To Find your Server's Public IP Address
If you do not know what your server's public IP address is, there are a number of ways you can find it. Usually, this is the address you use to connect to your server through SSH.From the command line, you can find this a few ways. First, you can use the
iproute2 tools to get your address by typing this:ip addr show eth0 | grep inet | awk '{ print $2; }' | sed 's/\/.*$//'
An alternative method is to use an outside party to tell you how it sees your server. You can do this by asking a specific server what your IP address is:
curl http://icanhazip.com
Step Two — Install MySQL
Now that we have our web server up and running, it is time to install MySQL. MySQL is a database management system. Basically, it will organize and provide access to databases where our site can store information.Again, we can use
apt to acquire and install our
software. This time, we'll also install some other "helper" packages
that will assist us in getting our components to communicate with each
other:sudo apt-get install mysql-server libapache2-mod-auth-mysql php5-mysql
sudo apt-get update
prior to the command. This is because we recently ran it in the
commands above to install Apache. The package index on our computer
should already be up-to-date.During the installation, your server will ask you to select and confirm a password for the MySQL "root" user. This is an administrative account in MySQL that has increased privileges. Think of it as being similar to the root account for the server itself (the one you are configuring now is a MySQL-specific account however).
When the installation is complete, we need to run some additional commands to get our MySQL environment set up securely.
First, we need to tell MySQL to create its database directory structure where it will store its information. You can do this by typing:
sudo mysql_install_db
sudo mysql_secure_installation
For the rest of the questions, you should simply hit the "ENTER" key through each prompt to accept the default values. This will remove some sample users and databases, disable remote root logins, and load these new rules so that MySQL immediately respects the changes we have made.
At this point, your database system is now set up and we can move on.
Step Three — Install PHP
PHP is the component of our setup that will process code to display dynamic content. It can run scripts, connect to our MySQL databases to get information, and hand the processed content over to our web server to display.We can once again leverage the
apt system to install our components. We're going to include some helper packages as well:sudo apt-get install php5 libapache2-mod-php5 php5-mcrypt
In most cases, we'll want to modify the way that Apache serves files when a directory is requested. Currently, if a user requests a directory from the server, Apache will first look for a file called
index.html. We want to tell our web server to prefer PHP files, so we'll make Apache look for an index.php file first.To do this, type this command to open the
dir.conf file in a text editor with root privileges:sudo nano /etc/apache2/mods-enabled/dir.conf
<IfModule mod_dir.c>
    DirectoryIndex index.html index.cgi index.pl index.php index.xhtml index.htm
</IfModule>
We want to move the PHP index file highlighted above to the first position after the DirectoryIndex specification, like this:<IfModule mod_dir.c>
DirectoryIndex index.php index.html index.cgi index.pl index.xhtml index.htm
</IfModule>
When you are finished, save and close the file by pressing "CTRL-X".
You'll have to confirm the save by typing "Y" and then hit "ENTER" to
confirm the file save location.After this, we need to restart the Apache web server in order for our changes to be recognized. You can do this by typing this:
sudo service apache2 restart
Install PHP Modules
To enhance the functionality of PHP, we can optionally install some additional modules.To see the available options for PHP modules and libraries, you can type this into your system:
apt-cache search php5-
php5-cgi - server-side, HTML-embedded scripting language (CGI binary)
php5-cli - command-line interpreter for the php5 scripting language
php5-common - Common files for packages built from the php5 source
php5-curl - CURL module for php5
php5-dbg - Debug symbols for PHP5
php5-dev - Files for PHP5 module development
php5-gd - GD module for php5
. . .
apt-cache show package_name
There will be a lot of output, with one field called Description-en which will have a longer explanation of the functionality that the module provides.For example, to find out what the
php5-cli module does, we could type this:apt-cache show php5-cli
. . .
SHA256: 91cfdbda65df65c9a4a5bd3478d6e7d3e92c53efcddf3436bbe9bbe27eca409d
Description-en: command-line interpreter for the php5 scripting language
 This package provides the /usr/bin/php5 command interpreter, useful for
 testing PHP scripts from a shell or performing general shell scripting tasks.
 .
 The following extensions are built in: bcmath bz2 calendar Core ctype date
 dba dom ereg exif fileinfo filter ftp gettext hash iconv libxml mbstring
 mhash openssl pcntl pcre Phar posix Reflection session shmop SimpleXML soap
 sockets SPL standard sysvmsg sysvsem sysvshm tokenizer wddx xml xmlreader
 xmlwriter zip zlib.
 .
 PHP (recursive acronym for PHP: Hypertext Preprocessor) is a widely-used
 open source general-purpose scripting language that is especially suited
 for web development and can be embedded into HTML.
Description-md5: f8450d3b28653dcf1a4615f3b1d4e347
Homepage: http://www.php.net/
. . .
apt-get install command like we have been doing for our other software.If we decided that
php5-cli is something that we need, we could type:sudo apt-get install php5-cli
apt-get install command, like this:sudo apt-get install package1 package2 ...At this point, your LAMP stack is installed and configured. We should still test out our PHP though.
Step Four — Test PHP Processing on your Web Server
In order to test that our system is configured properly for PHP, we can create a very basic PHP script.We will call this script
info.php. In order for Apache
to find the file and serve it correctly, it must be saved to a very
specific directory, which is called the "web root".In Ubuntu 14.04, this directory is located at
/var/www/html/. We can create the file at that location by typing:sudo nano /var/www/html/info.php
<?php
phpinfo();
?>
Now we can test whether our web server can correctly display content generated by a PHP script. To try this out, we just have to visit this page in our web browser. You'll need your server's public IP address again.
The address you want to visit will be:
http://your_server_IP_address/info.php
The page that you come to should look something like this: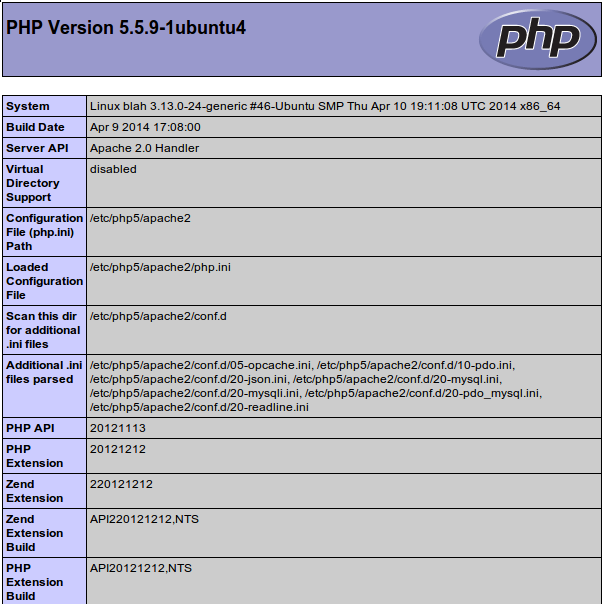
This page basically gives you information about your server from the perspective of PHP. It is useful for debugging and to ensure that your settings are being applied correctly.
If this was successful, then your PHP is working as expected.
You probably want to remove this file after this test because it could actually give information about your server to unauthorized users. To do this, you can type this:
sudo rm /var/www/html/info.php
Conclusion
Now that you have a LAMP stack installed, you have many choices for what to do next. Basically, you've installed a platform that will allow you to install most kinds of websites and web software on your server.Some popular options are:
- Install Wordpress the most popular content management system on the internet
- Set Up PHPMyAdmin to help manage your MySQL databases from web browser.
- Learn more about MySQL to manage your databases.
- Learn how to create an SSL Certificate to secure traffic to your web server.
- Learn how to use SFTP to transfer files to and from your server.
How To Set Up Apache Virtual Hosts on Ubuntu 14.04 LTS
How To Set Up Apache Virtual Hosts on Ubuntu 14.04 LTS
Introduction
The Apache web server is the most popular way of serving web content on the internet. It accounts for more than half of all active websites on the internet and is extremely powerful and flexible.Apache breaks its functionality and components into individual units that can be customized and configured independently. The basic unit that describes an individual site or domain is called a
virtual host.These designations allow the administrator to use one server to host multiple domains or sites off of a single interface or IP by using a matching mechanism. This is relevant to anyone looking to host more than one site off of a single VPS.
Each domain that is configured will direct the visitor to a specific directory holding that site's information, never indicating that the same server is also responsible for other sites. This scheme is expandable without any software limit as long as your server can handle the load.
In this guide, we will walk you through how to set up Apache virtual hosts on an Ubuntu 14.04 VPS. During this process, you'll learn how to serve different content to different visitors depending on which domains they are requesting.
Prerequisites
Before you begin this tutorial, you should create a non-root user as described in steps 1-4 here.You will also need to have Apache installed in order to work through these steps. If you haven't already done so, you can get Apache installed on your server through
apt-get:sudo apt-get update
sudo apt-get install apache2
For the purposes of this guide, my configuration will make a virtual host for
example.com and another for test.com. These will be referenced throughout the guide, but you should substitute your own domains or values while following along.To learn how to set up your domain names with DigitalOcean, follow this link. If you do not have domains available to play with, you can use dummy values.
We will show how to edit your local hosts file later on to test the configuration if you are using dummy values. This will allow you to test your configuration from your home computer, even though your content won't be available through the domain name to other visitors.
Step One — Create the Directory Structure
The first step that we are going to take is to make a directory structure that will hold the site data that we will be serving to visitors.Our
document root (the top-level directory that Apache looks at to find content to serve) will be set to individual directories under the /var/www directory. We will create a directory here for both of the virtual hosts we plan on making.Within each of these directories, we will create a
public_html file that will hold our actual files. This gives us some flexibility in our hosting.For instance, for our sites, we're going to make our directories like this:
sudo mkdir -p /var/www/example.com/public_html
sudo mkdir -p /var/www/test.com/public_html
The portions in red represent the domain names that we are wanting to serve from our VPS.
Step Two — Grant Permissions
Now we have the directory structure for our files, but they are owned by our root user. If we want our regular user to be able to modify files in our web directories, we can change the ownership by doing this:sudo chown -R $USER:$USER /var/www/example.com/public_html sudo chown -R $USER:$USER /var/www/test.com/public_htmlThe
$USER variable will take the value of the user you
are currently logged in as when you press "ENTER". By doing this, our
regular user now owns the public_html subdirectories where we will be storing our content.We should also modify our permissions a little bit to ensure that read access is permitted to the general web directory and all of the files and folders it contains so that pages can be served correctly:
sudo chmod -R 755 /var/www
Step Three — Create Demo Pages for Each Virtual Host
We have our directory structure in place. Let's create some content to serve.We're just going for a demonstration, so our pages will be very simple. We're just going to make an
index.html page for each site.Let's start with
example.com. We can open up an index.html file in our editor by typing:nano /var/www/example.com/public_html/index.html
In this file, create a simple HTML document that indicates the site it is connected to. My file looks like this:<html>
<head>
<title>Welcome to Example.com!</title>
</head>
<body>
<h1>Success! The example.com virtual host is working!</h1>
</body>
</html>
Save and close the file when you are finished.We can copy this file to use as the basis for our second site by typing:
cp /var/www/example.com/public_html/index.html /var/www/test.com/public_html/index.htmlWe can then open the file and modify the relevant pieces of information:
nano /var/www/test.com/public_html/index.html
<html>
  <head>
    <title>Welcome to Test.com!</title>
  </head>
  <body>
    <h1>Success!  The test.com virtual host is working!</h1>
  </body>
</html>
Save and close this file as well. You now have the pages necessary to test the virtual host configuration.Step Four — Create New Virtual Host Files
Virtual host files are the files that specify the actual configuration of our virtual hosts and dictate how the Apache web server will respond to various domain requests.Apache comes with a default virtual host file called
000-default.conf that we can use as a jumping off point. We are going to copy it over to create a virtual host file for each of our domains.We will start with one domain, configure it, copy it for our second domain, and then make the few further adjustments needed. The default Ubuntu configuration requires that each virtual host file end in
.conf.Create the First Virtual Host File
Start by copying the file for the first domain:sudo cp /etc/apache2/sites-available/000-default.conf /etc/apache2/sites-available/example.com.conf
Open the new file in your editor with root privileges:sudo nano /etc/apache2/sites-available/example.com.conf
The file will look something like this (I've removed the comments here to make the file more approachable):<VirtualHost *:80>
ServerAdmin webmaster@localhost
DocumentRoot /var/www/html
ErrorLog ${APACHE_LOG_DIR}/error.log
CustomLog ${APACHE_LOG_DIR}/access.log combined
</VirtualHost>
As you can see, there's not much here. We will customize the items
here for our first domain and add some additional directives. This
virtual host section matches any requests that are made on port 80, the default HTTP port.First, we need to change the
ServerAdmin directive to an email that the site administrator can receive emails through.ServerAdmin admin@example.com
After this, we need to add two directives. The first, called ServerName,
establishes the base domain that should match for this virtual host
definition. This will most likely be your domain. The second, called ServerAlias, defines further names that should match as if they were the base name. This is useful for matching hosts you defined, like www:ServerName example.com ServerAlias www.example.comThe only other thing we need to change for a basic virtual host file is the location of the document root for this domain. We already created the directory we need, so we just need to alter the
DocumentRoot directive to reflect the directory we created:DocumentRoot /var/www/example.com/public_html
In total, our virtualhost file should look like this:<VirtualHost *:80>
ServerAdmin admin@example.com
ServerName example.com
ServerAlias www.example.com
DocumentRoot /var/www/example.com/public_html
ErrorLog ${APACHE_LOG_DIR}/error.log
CustomLog ${APACHE_LOG_DIR}/access.log combined
</VirtualHost>
Save and close the file.Copy First Virtual Host and Customize for Second Domain
Now that we have our first virtual host file established, we can create our second one by copying that file and adjusting it as needed.Start by copying it:
sudo cp /etc/apache2/sites-available/example.com.conf /etc/apache2/sites-available/test.com.confOpen the new file with root privileges in your editor:
sudo nano /etc/apache2/sites-available/test.com.conf
You now need to modify all of the pieces of information to reference
your second domain. When you are finished, it may look something like
this:<VirtualHost *:80>
ServerAdmin admin@test.com
ServerName test.com
ServerAlias www.test.com
DocumentRoot /var/www/test.com/public_html
ErrorLog ${APACHE_LOG_DIR}/error.log
CustomLog ${APACHE_LOG_DIR}/access.log combined
</VirtualHost>
Save and close the file when you are finished.Step Five — Enable the New Virtual Host Files
Now that we have created our virtual host files, we must enable them. Apache includes some tools that allow us to do this.We can use the
a2ensite tool to enable each of our sites like this:sudo a2ensite example.com.conf sudo a2ensite test.com.confWhen you are finished, you need to restart Apache to make these changes take affect:
sudo service apache2 restart
 * Restarting web server apache2
 AH00558: apache2: Could not reliably determine the server's fully qualified domain name, using 127.0.0.1. Set the 'ServerName' directive globally to suppress this message
Step Six — Set Up Local Hosts File (Optional)
If you haven't been using actual domain names that you own to test this procedure and have been using some example domains instead, you can at least test the functionality of this process by temporarily modifying thehosts file on your local computer.This will intercept any requests for the domains that you configured and point them to your VPS server, just as the DNS system would do if you were using registered domains. This will only work from your computer though, and is simply useful for testing purposes.
Make sure you are operating on your local computer for these steps and not your VPS server. You will need to know the computer's administrative password or otherwise be a member of the administrative group.
If you are on a Mac or Linux computer, edit your local file with administrative privileges by typing:
sudo nano /etc/hosts
The details that you need to add are the public IP address of your VPS server followed by the domain you want to use to reach that VPS.
For the domains that I used in this guide, assuming that my VPS IP address is
111.111.111.111, I could add the following lines to the bottom of my hosts file:127.0.0.1 localhost 127.0.1.1 guest-desktop 111.111.111.111 example.com 111.111.111.111 test.comThis will direct any requests for
example.com and test.com on our computer and send them to our server at 111.111.111.111. This is what we want if we are not actually the owners of these domains in order to test our virtual hosts.Save and close the file.
Step Seven — Test your Results
Now that you have your virtual hosts configured, you can test your setup easily by going to the domains that you configured in your web browser:http://example.com
You should see a page that looks like this:
Likewise, if you can visit your second page:
http://test.com
You will see the file you created for your second site:
If both of these sites work well, you've successfully configured two virtual hosts on the same server.
If you adjusted your home computer's hosts file, you may want to delete the lines you added now that you verified that your configuration works. This will prevent your hosts file from being filled with entries that are not actually necessary.
If you need to access this long term, consider purchasing a domain name for each site you need and setting it up to point to your VPS server.
Conclusion
If you followed along, you should now have a single server handling two separate domain names. You can expand this process by following the steps we outlined above to make additional virtual hosts.There is no software limit on the number of domain names Apache can handle, so feel free to make as many as your server is capable of handling.
Hacker Alert: Here Are 8 Major Types Of DDoS Attacks
1.UDP Flood
A UDP flood attack is a denial-of-service (DoS) attack using the User Datagram Protocol (UDP), a sessionless/connectionless computer networking protocol. Using UDP for denial-of-service attacks is not as straightforward as with the Transmission Control Protocol (TCP). However, a UDP flood attack can be initiated by sending a large number of UDP packets to random ports on a remote host. As a result, the distant host will: check for the application listening at that port, see that no application listens at that port and reply with an ICMP Destination Unreachable packet.
2.Ping of Death
A ping of death is a type of attack on a computer that involves sending a malformed or otherwise malicious ping to a computer. A correctly formed ping message is typically 56 bytes in size, or 84 bytes when the Internet Protocol (IP) header is considered. Historically, many computer systems could not properly handle a ping packet larger than the maximum IPv4 packet size of 65535bytes. Larger packets could crash the target computer. In early implementations of TCP/IP, this bug was easy to exploit. This exploit affected a wide variety of systems, including Unix, Linux, Mac, Windows, printers, and routers.
3.Reflected / Spoofed attack
A distributed denial of service attack may involve sending forged requests of some type to a very large number of computers that will reply to the requests. Using Internet Protocol address spoofing, the source address is set to that of the targeted victim, which means all the replies will go to (and flood) the target.
4.Nuke
A Nuke is an old denial-of-service attack against computer networks consisting of fragmented or otherwise invalid ICMP packets sent to the target, achieved by using a modified ping utility to repeatedly send this corrupt data, thus slowing down the affected computer until it comes to a complete stop.
5.Slowloris
Slowloris is a piece of software written by Robert "RSnake" Hansen which allows a single machine to take down another machine's web server with minimal bandwidth and side effects on unrelated services and ports. Slowloris tries to keep many connections to the target web server open and hold them open as long as possible. It accomplishes this by opening connections to the target web server and sending a partial request.
6.Unintentional DDoS
This describes a situation where a website ends up denied, not due to a deliberate attack by a single individual or group of individuals, but simply due to a sudden enormous spike in popularity. This can happen when an extremely popular website posts a prominent link to a second, less well-prepared site, for example, as part of a news story.
7.Zero Day DDoS
General term used to describe vulnerabilities and exploits that are still new and haven't been patched yet.
8.SYN Flood
A SYN flood is a form of denial-of-service attack in which an attacker sends a succession of SYN requests to a target's system in an attempt to consume enough server resources to make the system unresponsive to legitimate traffic.
Subscribe to:
Posts (Atom)